FUxCon 2013
Django 1.5
Installation
Django follows the Python philosophy of having batteries included. However, even for our small project we need to install some additional extensions so using a package manager is a good idea. The Python world has homed in on the virtualenv tool for that.
Once Django is installed, a command line tool manage.py is used for all tasks like starting a development server or performing database migrations.
The installation steps a re described in its README.
You can get the code for this implementation from its github repository.
The repository contains a simple install script that loads all required components and sets up a simple demo configuration. Please follow the instructions in the file README.md contained in the repository.
There is also a virtual appliance based on VirtualBox which you can install for free locally on your computer or host on the web. This appliance has a website for each of the four web framworks readily installed. Please ask me about the appliance at the workshop or contact me directly.
Basic configuration
Django refers to itself not as a Model-View-Controller framework, but rather as a Model-View-Template framework, i.e. views take the role of controllers and templates that of views in the other frameworks.
Our simple project consists only of a single app (the contents of the projects directory). Generally though, Django projects consist of multiple apps, each with its own set of routes, models, views, templates.
Once a new project is created with the common line tool manage.py, Django uses a single file (projects/settings.py in our case) to configure most of its components and functionality. Routes are kept in a different file though. Optionally, different hosts can be configured for a multi-domain setup. We don’t use this feature, though.
| File in projects | Major settings |
|---|---|
| settings.py |
Basics:
|
| urls.py | Routes for our app, mapping regular expressions to views |
| admin.py | Settings for the admin interface automatically generated from the models |
Modeling the problem domain - the models
Django follows a content-first approach. Once you have defined your models, you automatically get an API and a fully working admin interface that you can use to enter content into the database. Each app can have its own models. All model classes for an app are defined in the single file app/models.py
All fields are declared. You then create the database tables with the command line tool:
manage.py syncdb
Here is part of the model file app/projects/models.py from our Django model:
class Project(models.Model):
  class Meta:
    verbose_name = 'Projekt'
    verbose_name_plural = 'Projekte'
    db_table = 'projects'
    get_latest_by = 'modified'
    ordering = ['title']

  user = models.ForeignKey(User)
  slug = models.SlugField()
  title = models.CharField(max_length=255)
  about = models.TextField(blank=True, null=True)
  photo = models.ImageField(upload_to='project', blank=True, null=True)

  # derived images implemented with extension django-imagekit:
  photo_thumbnail = ImageSpecField(source='photo', processors=[ResizeToFill(100, 100)],
    format='JPEG', options={'quality': 60}
  )
  photo_medium = ImageSpecField(source='photo', processors=[ResizeToFill(200, 200)],
    format='JPEG', options={'quality': 60}
  )
  photo_big = ImageSpecField(source='photo', processors=[ResizeToFill(380, 380)],
    format='JPEG', options={'quality': 60}
  )

  start_date = models.DateField(blank=True, null=True)
  end_date = models.DateField(blank=True, null=True)

  # tags implemented by extension django-taggit
  tags = TaggableManager(blank=True)

  created = models.DateTimeField(auto_now_add=True)
  modified = models.DateTimeField(auto_now=True)

  def __unicode__(self):
    return 'Project #' + str(self.id) + ': ' + self.title

  def admin_thumbnail(self):
    if self.photo:
      return '<img src="%s">' % self.photo_thumbnail.url
  admin_thumbnail.allow_tags = True
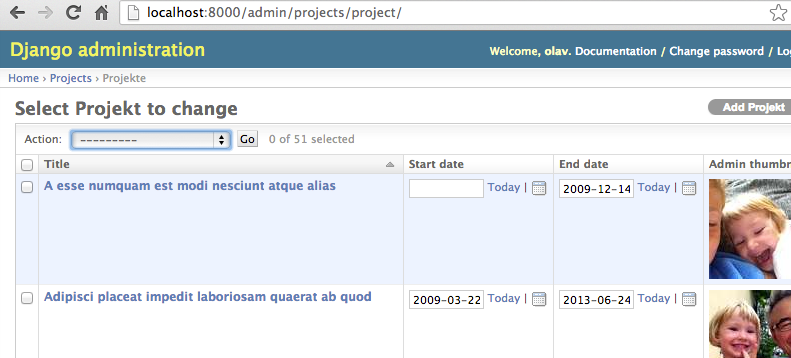
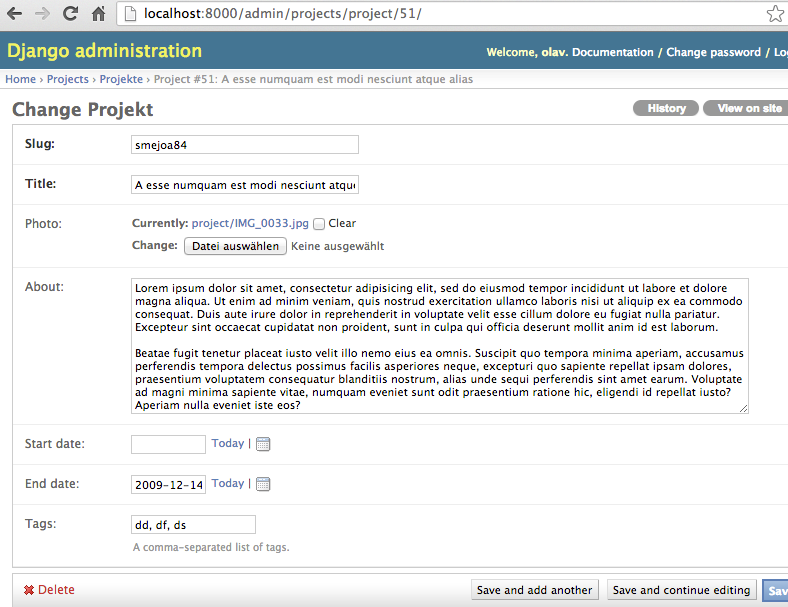
From this, Django generates the admin interface. If you want to further specify aspects of your admin interface, you can do so in a separate file. Here is part of our projects/admin.py:
class ProjectAdmin(admin.ModelAdmin):
  #date_hierarchy = 'start_date'
  list_display = ('title', 'start_date', 'end_date', 'admin_thumbnail')
  list_editable = ('start_date', 'end_date')
  prepopulated_fields = {'slug': ('title',)}

  fieldsets = (
    (None, {
      'fields': (
        'slug',
        'title',
        'photo',
        'about',
        'start_date',
        'end_date',
        'tags',
      ),
    }),
  )

admin.site.register(Project, ProjectAdmin)
Here are screenshots from the generated admin interface. This includes user accounts:
Business logic - the views
Django configures URLs for an app in its file urls.py. Here is an excerpt from our projects/urls.py:
urlpatterns = patterns('projects.views',
  url(r'^$', 'index', name='project_list'),
)

urlpatterns += patterns('',
  url(r'^project/(?P<pk>\d+)/$', ProjectDetailView.as_view(), name='project'),
  url(r'^project/add/$', ProjectAddView.as_view(), name='add_project'),
  url(r'^project/edit/(?P<pk>\d+)/$', ProjectEditView.as_view(), name='edit_project'),

  url(r'^user/', include(django.contrib.auth.urls)),
)
URLs are named to be able to generated named URLs in views. Views can be methods in our own implementation (e.g. the function projects.views.index() ) or can be classes from other apps. It is also possible to mount while ranges of URLs under a common root as is done in our example for the user handling.
Here is the view function for listing projects in file projects/views.py:
GRID_COL = 12
NO_COL = 3
PER_PAGE = 5

def index(request):
  project_list = Project.objects.all()
  paginator = Paginator(project_list, PER_PAGE)

  page = request.GET.get('page')

  try:
    projects = paginator.page(page)

  except PageNotAnInteger:
    # If page is not an integer, deliver first page.
    projects = paginator.page(1)

  except EmptyPage:
    # If page is out of range (e.g. 9999), deliver last page of results.
    projects = paginator.page(paginator.num_pages)

  columns = [[] for x in range(0, NO_COL)]
  for i, project in enumerate(projects):
    col = i % NO_COL;
    columns[col].append(project);

  tags = Project.tags.most_common()

  return render(request, 'projects/index.html', {
    'body_class': 'projects-index',
    'columns': columns,
    'projects': projects,
    'tags': tags,
    'width': GRID_COL / NO_COL,
  })
Pagination uses the class Paginator from the system component django.core.paginator.
Appearance - the templates
In Django, templates can be application specific or global. Here is an excerpt from our file templates/index.html:
{% extends 'layout.html' %}
{% load markup %}

{% block content %}
  <div class="row-fluid marketing projects">
  {% for column in columns %}
    <div class="span{{ width }}">
    {% for project in column %}
      <div class="project">
        <h4>
          <a href="{% url 'project' project.id %}">
            {{ project.title }}
          </a>
        </h4>
        <a href="{% url 'project' project.id %}">
          {% if project.photo %}
            <img class="project-detail" src="{{ project.photo_medium.url }}">
          {% else %}
            <img class="project-detail" src="/static/img/ni.png">
          {% endif %}
        </a>
        <p>{{ project.about|truncatewords:"40" }}</p>
      </div>
    {% endfor %}
    </div>
  {% endfor %}
  </div>

  {% include '_paginate.html' with projects=projects %}
{% endblock %}
Django has its own template language. In this example, the columns variable is provided by the view. Function calls to url use named routes with parameters to generate proper URIs. Scaled photos are declared in the model and can be accessed as ordinary model fields, e.g. project.photo_medium.url. The code for a paginator at the bottom of the page is included from another template file.
User accounts & security
Our implementation uses Django’s built-in authentication app and middleware for managing user accounts. There is a page in the documentation on how Django stores passwords in the database. For object-level permissions, we write a custom authentication backend and register it as well:
virtualenv .env
source .env/bin/activate
pip install django-object-permissions
The complete declaration for these components in projects/settings.py look like this:
MIDDLEWARE_CLASSES = (
    'django.contrib.auth.middleware.AuthenticationMiddleware',
)

INSTALLED_APPS = (
    'django.contrib.auth',
    'django.contrib.contenttypes',
    'django.contrib.sessions',
    'object_permissions',
)

AUTHENTICATION_BACKENDS = (
    'projects.models.PermBackend',
)
We mount the views for user management by including the routes in projects/urls.py:
urlpatterns += patterns('',
  url(r'^user/', include(django.contrib.auth.urls)),
)
The authentication backend in file projects/models.py implements a new method has_perm() and looks like this:
class Project(models.Model):
  class Meta:
    permissions = (
      ('can_edit', "Can edit project"),
    )

class PermBackend(ModelBackend):
  def has_perm(self, user, perm, obj=None):
    "Owner and admin can edit"

    if perm != 'can_edit' or obj is None:
      return super(PermBackend, self).has_perm(user, perm, obj)

    if user.is_superuser:
      return True

    return obj.user.id == user.id
This backend enhances the method has_perm() on user objects. We can therefore now check for object-level permissions in our edit view (file projects/views.py):
class ProjectEditView(UpdateView):

  def dispatch(self, request, *args, **kwargs):
    project = self.get_object()

    if not request.user.has_perm('can_edit', project):
      messages.error(request,
        'You are not allowed to edit project #' + str(project.id)
      )
      return HttpResponseRedirect(reverse('project', args=(project.id,)))

    return super(ProjectEditView, self).dispatch(request, *args, **kwargs)
Assiging topics to projects with tagging
There are several alternative extensions to implement tagging in Django. Unfortunately, the most popular one is also no longer maintained. We chose django-tagging and installed it with
source env/bin/activate
pip install django-tagging
As usual, the extension is registered as an installed app in projects/settings.py:
INSTALLED_APPS = (
    'taggit',
)
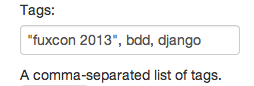
As explained in the documentation of the extension, it relies on a field in the model that is a TaggableManager. With that in place, taggit automatically converts a comma separated list of tags into the proper entries in the two tables taggit_tag and taggig_taggeditem that the extension adds to the database. With this

… is entered as
Picture uploading and scaling
In our Django implementation, pictures and derived picture formats are handled by the django-imagekit extension. There would have been some alternatives.
After installing with pip and registering in INSTALLED_APPS in the usual way, we can add special fields to our project model in file projects/models.py:
class Project(models.Model):
  photo = models.ImageField(upload_to='project', blank=True, null=True)

  # derived images: https://github.com/matthewwithanm/django-imagekit#readme
  photo_thumbnail = ImageSpecField(source='photo',
    processors=[ResizeToFill(100, 100)],
    format='JPEG',
    options={'quality': 60}
  )
  photo_medium = ImageSpecField(source='photo',
    processors=[ResizeToFill(200, 200)],
    format='JPEG',
    options={'quality': 60}
  )
  photo_big = ImageSpecField(source='photo',
    processors=[ResizeToFill(380, 380)],
    format='JPEG',
    options={'quality': 60}
  )

  def admin_thumbnail(self):
    if self.photo:
      return '<img src="%s">' % self.photo_thumbnail.url
  admin_thumbnail.allow_tags = True
Derived images are special fields that are filled during project save. These fields are not stored in the database. Only the path to the original photo is stored in a column in the database.
In addition to the fields, we also add a method that provides the admin interface with a thumbnail for the project list view.
Once these fields are added to the model, they can be accessed from templates like any other image field. Here is an excerpt from our project detail page in file templates/projects/detail.html:
{% if project.photo %}
<p class="thumbnail picture-content">
  <img src="{{ project.photo_big.url }}">
</p>
{% endif %}
Forms and CRUD - Creating and updating projects
In our Django implementation, the models already provide an API to read, create & update, and delete domain objects, projects in our case.
URL patterns link to the responsible views:
urlpatterns = patterns('',
  url(r'^project/(?P<pk>\d+)/$', ProjectDetailView.as_view(), name='project'),
  url(r'^project/add/$', ProjectAddView.as_view(), name='add_project'),
  url(r'^project/edit/(?P<pk>\d+)/$', ProjectEditView.as_view(), name='edit_project'),
These views are defined in file projects/views.py. Actually, these classes are only concerned with permissions. They inherit all the CRUD functionality directly fron built-in views in Django:
class ProjectAddView(ProjectMixin, CreateView):
  pass

class ProjectEditView(ProjectMixin, UpdateView):
  pass
The ProjectMixin keeps non-owners from editing projects as explained elsewhere.
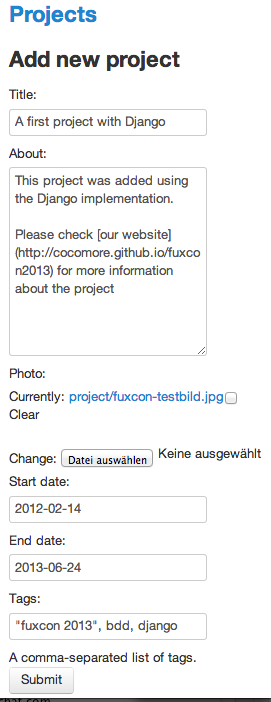
With the support of this rather short template in templates/projects/project_form.html:
{% extends 'layout.html' %}

{% block content %}
{# http://blog.headspin.com/?p=541 #}
<form method="POST" enctype="multipart/form-data">
  <h3>Add new project</h3>
  {{ form }}{% csrf_token %}
  <div class="submit">
    <button id="save-button" class="btn" type="submit">Submit</button>
  </div>
</form>
{% endblock content %}
… the edit form looks like this
Text formatting with Markdown
By enabling the markup app that comes with Django, we get Markup formatting in our Django implementation. This app relies on the Python library markdown that we install with pip:
source env/bin/activate
pip install markdown
The markup app needs to be included in the Django settings as usual:
INSTALLED_APPS = (
  'django.contrib.markup',
)
With this, we can use markdown formatting in templates. Here is an excerpt from file templates/projects/detail.html:
{% load markup %}
<div class="about-content">{{ project.about|markdown }}</div>
Shortening of teaser texts can be done with a built-in template filter. Here is an excerpt from file templates/projects/index.html
<p>{{ project.about|truncatewords:"40" }}</p>
Test data generation
In our Django implementation, we use the app autofixture that we install in the usual way:
source env/bin/activate
pip install django-autofixture
… and register it with Django in file projects/settings.py:
INSTALLED_APPS = (
  'autofixture',
)
Whith that, we have a new verb in the manage.py shell that we can use to generate test data:
python manage.py loadtestdata projects.Project:50
Currently, there are not special provisions to re-generate test data during the running of tests from Behat.
comments powered by Disqus